How to Stop Low Disk Space Notification in Windows 10
Maintaining a good amount of personal space is important for every individual's wellbeing. Even extroverts need it for their mental health. The same is true for computers. In order to keep yours in a good condition and performing at its best, you have to make sure that it has enough disk space.
On the other hand, there are instances when you have low disk space on Windows 10 and for some important reason, you don't have the option to delete files. When you have less than 200 MB of space left on any partition of your computer, Windows will display 'Low Disk Space' messages on your screen. These notifications are useful, but sometimes, you just want them to leave so you can get on with your work.
Before Anything Else…
If the notification has something to do with your system drive, you should not ignore it and start to free up space. It is worth noting that Windows does not function properly if there is not enough space on this drive. If it is full, you will start to encounter malfunctioning and crashing applications.
If you've been notified that your computer is running low on system drive space, you should start deleting files or begin uninstalling unnecessary applications. We won't deny that this process can be complicated and time-consuming. So, we recommend automating it, using Auslogics BoostSpeed. This reliable tool can run a complete checkup of your entire system. Just by clicking a button, you can identify junk files and reclaim gigabytes of space on your PC. Once you restart your computer, you can fix low disk space on boot and get rid of the warnings. What's more, it comes with other features that help you protect your privacy and reduce chances of errors and crashes.
RECOMMENDED

Resolve PC Issues with Auslogics BoostSpeed
Besides cleaning and optimizing your PC, BoostSpeed protects privacy, diagnoses hardware issues, offers tips for boosting speed and provides 20+ tools to cover most PC maintenance and service needs.
FREE DOWNLOAD

In some cases, the notifications may apply to non-system drives. For instance, if a certain drive accommodates a recovery partition and it is almost full, you will start to see this warning. If the recovery partition becomes visible, we suggest you hide it. If you're not worried about potential problems that may come with a full data drive and you want to ignore the notifications, you can simply disable them.
Using Windows Registry to Disable the Notifications
You can modify the settings in the registry to disable the low disk space notifications. This change is system-wide, so you will stop receiving warnings for low disk space on any of the drives in your computer.
Important note: Windows Registry is a sensitive database, and when you make any mistake, your system can become unstable or inoperable. Remember to create a backup of the registry before trying our solution. In this way, you can undo the changes if you make errors. If you're confident that you can accurately follow our instructions, then feel free to move forward with the steps below:
- Click the Search icon on the taskbar.
- Type "regedit" (no quotes), then press Enter.
- If you're prompted to provide Registry Editor consent to make changes on your computer, click Yes.
- Navigate to the following path:
HKEY_CURRENT_USER\SOFTWARE\Microsoft\Windows\CurrentVersion\Policies\Explorer
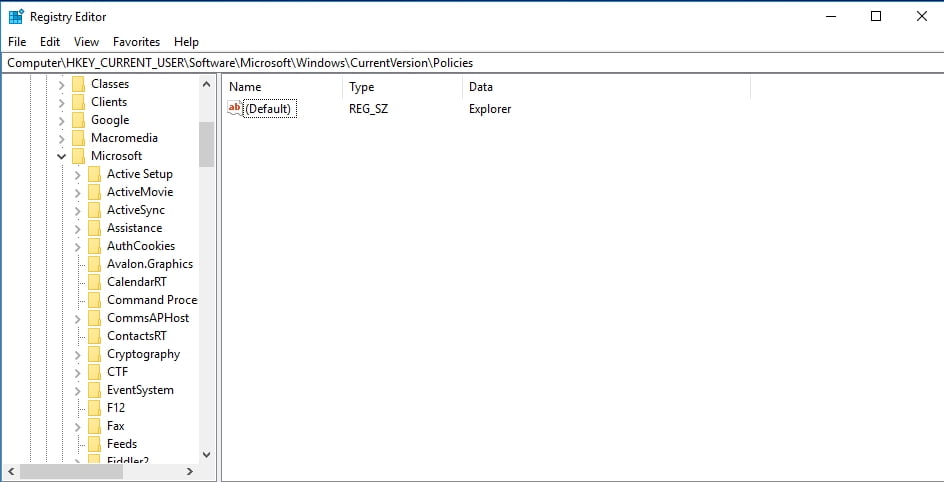
- Go to the left bar menu and select Policies.
- Right-click a blank area on the right pane.
- Click New, then select DWORD (32-bit) Value.
- Use "NoLowDiscSpaceChecks" (no quotes) as the name of the value.
- Note: Microsoft uses 'disc' instead of 'disk' for this registry entry.
- Double-click the NoLowDiscSpaceChecks value you've just created. In the Value Data box, type "1" (no quotes).
- Click OK.
- Exit Registry Editor.
- Restart your PC to let the changes take effect.
If you want to bring back the low disk space notifications, you can simply follow steps one to four. Right-click the NoLowDiscSpaceChecks value, then delete it.
Have you tried this method?
Let us know the results in the comments below!
Do you like this post? 🙂
Please rate and share it and subscribe to our newsletter!
17 votes, average: 5.00 out of 5
![]() Loading...
Loading...
How to Stop Low Disk Space Notification in Windows 10
Source: https://www.auslogics.com/en/articles/disable-low-disk-space-notification-on-windows/
0 Response to "How to Stop Low Disk Space Notification in Windows 10"
Post a Comment